Thursday, January 31, 2013

Hubby's Valentine Card

I can post my hubby's valentine card since he never looks at my blog:)


I recently bought this bare tree stamp from Memory Box.  I stamped it on cream cardstock in black ink and then stamped the deer from Stampscapes in brown ink.  The sentiment and heart are on the same stamp from Memory Box and the heart fits perfectly in the branches that form a heart.  I think you could use this stamp for other projects without highlighting the heart in the branches and one would never notice.
The image was mounted on the inside of the precut card from The Paper Cut.  I lined the inside of the card with cream paper.  Very simple and masculine card.  Think this is the last of my valentine cards to post.  I'm onto spring birthday cards which is a wonderful way to chase away the winter doldrums!
Posted by Picasa

Wednesday, January 30, 2013

Golden Hearts

One more card made with Nested Hearts from Spellbinders.


All three sizes of the hearts were cut and embossed (except the middle size on the designer paper) on gold metallic cardstock.  These were mounted on the Penny Black designer paper which was mounted on a gold metallic square card.  The corners were rounded, some bling added along with Prima flowers.  A very simple card to create but also elegant and could be used for a wedding card. 
Posted by Picasa

Tuesday, January 29, 2013

Cracker Box Palace

I so liked this sentiment from Cracker Box Palace,  just had to have it.  Thanks Vicky!


This is a very simple sympathy card.  The transparency is from The Mark-It-Place and mounted on shimmer paper and attached to the backside of the precut card from The Paper Cut.  The transparencies and precut cards make beautiful and quick cards to assemble.  Take a few minutes to visit Vicky's blog and store.  They offer some beautiful stamps.  Have a great day! 
Posted by Picasa

Monday, January 28, 2013

Decorative Hearts


I really enjoyed creating valentine cards with Spellbinder's Nested Hearts.  So here's another!


I cut and embossed the middle and smallest heart on white cardstock and then sponged Spun Sugar Distressed Ink over the hearts while keeping the dies in place.  I cut designer paper with Decorative Labels One, also from Spellbinders.  I then cut a smaller Decorative Labels One and took the next smaller Labels One to create a frame out of white cardstock.  All was assembled on a square card and sponged with Spun Sugar Distress Ink and rounded the corners.  I will have one more card made with the Nested Hearts to show you soon:)
Posted by Picasa

Saturday, January 26, 2013

Valentine Heart

This was a fun heart to create. I stamped and white embossed the heart on white cardstock.

 
Posted by Picasa

I took various colors of mementos inks and sponges to create the different colors within the heart and then hand cut. Layer the main image onto coordinating cardstock along with an embossed panel, ribbon and sentiment. Pretty fun and easy to create

Wednesday, January 9, 2013

January Stamp Club Shoe Box

My turn to provide one of the shoe box projects at our monthly stamp club. I've seen this technique a couple of times on the internet and here's my take.

 
Posted by Picasa

I made a "frame" mask and temporarily taped it to a white piece of card stock. I brayered light blue ink over the card stock. Without removing the mask, spritz the card stock with any kind of sparkly spray. Remove the mask and be sure to remove all the temporary tape from the card stock. Stamp over the spritzed area, once dried. Add any bling, sentiment and layers and adhere to your base card. Simply pretty!

Monday, January 7, 2013

Doily Die

My stamp club friend, Marie, sent me two die cut doilies. Thanks Marie! I had fun coming up with ideas to use these doilies in different ways.


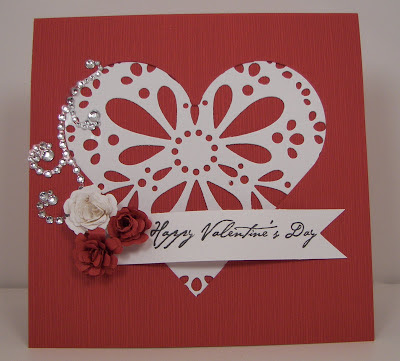
This valentine card was die cut with the large heart from Spellbinder's and then placed the doily behind the heart. I die cut flowers from Spellbinder's Itty Bitty Blossoms set. The banner was hand cut and the sentiment is from Impress Rubber Stamps. Attached the flowers to the banner/card front and added the bling.

 
Posted by Picasa

The second is very simple. I embossed the green card stock with a Sizzix folder. Attached the doily in the corner and trimmed down. The tag is one of the small Labels Four from Spellbinder's and the sentiment is from Flourishes. Added the the bling and done.